
Lorem ipsum dolor sit amet, consectetur adipiscing elit. Ut elit tellus, luctus nec ullamcorper mattis, pulvinar dapibus leo.
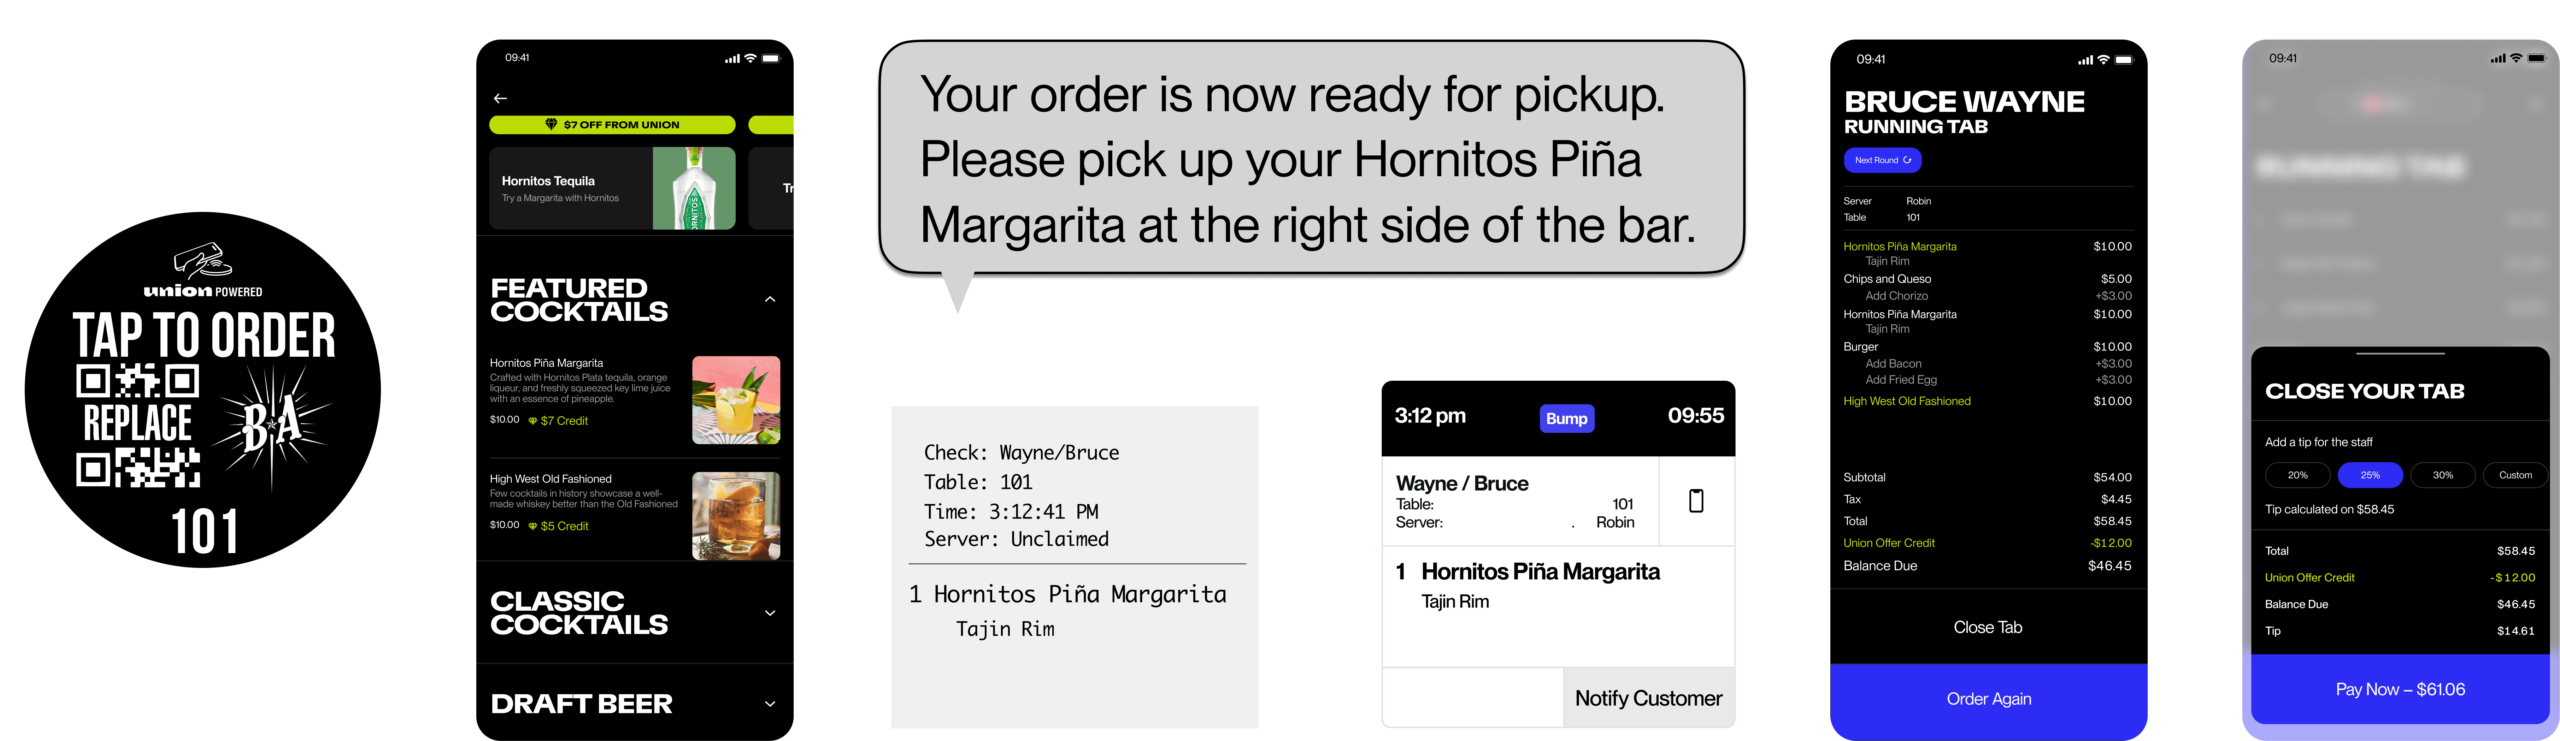
union mobile Guest-led ordering:
tap or scan, open tab, order, and pay
SHARE
IN THIS GUIDE
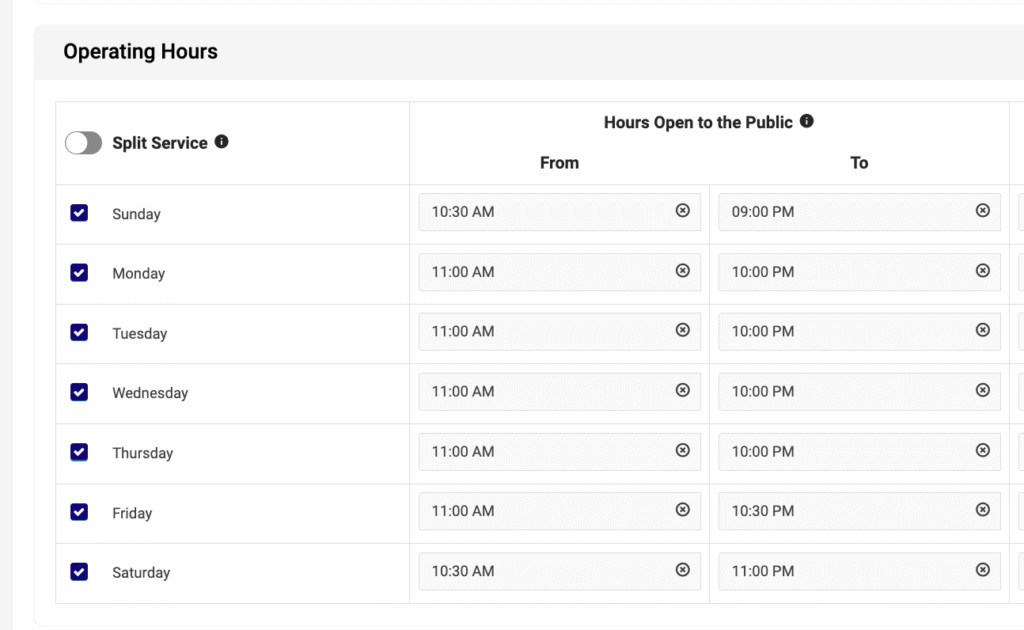
1. SET YOUR VENUE OPERATING HOURS
Union Mobile guest ordering and guest open tab are only available during your venue’s operating hours.
Navigate to: Settings > Venue Details
NOTE
There is a built-in 15-minute buffer before your set closing time. Guests will not be able to open or close a Union Mobile guest tab or place new orders during this window.
2. ENABLE UNION MOBILE ORDERING
When you’re ready to allow guests to order from their phones, navigate to:
Settings > Online ordering > Toggle Enable Mobile Orders to on.
NOTE
When disabled, guests can still view your digital menu, see Union offers, and open a Union Mobile tab to order with staff if within your operating hour settings.

3. SET UP YOUR ORDER CONFIRMATION MESSAGE
Once Union Mobile Orders are enabled, you’ll have the option to add a custom message that guests will see immediately after placing an order. Use this message to set clear expectations for your service model, whether orders are delivered to the table, picked up at a designated location, or another process unique to your venue. A clear message helps reduce guest confusion and creates a smoother experience from the start.
EXAMPLE MESSAGES
“We’ll bring your order out to you shortly!”
“Your order is being prepared. Please pick it up at the bar window once you receive the order ready text.”
4. SET ORDER PROCESSING TERMINAL & CONFIGURE PRINTER ROUTING
Still in Settings > Online Ordering, scroll down to assign a terminal to process any online orders and set or adjust where each station prints.
IMPORTANT
One register must be designated to process all incoming orders. This terminal must be powered on with the Union POS app open (at minimum to the login screen) at all times. If the terminal is off or the app is closed, guests will see an error when attempting to order.
Staff should be advised to use this terminal exclusively for Union, so it’s never accidentally closed.
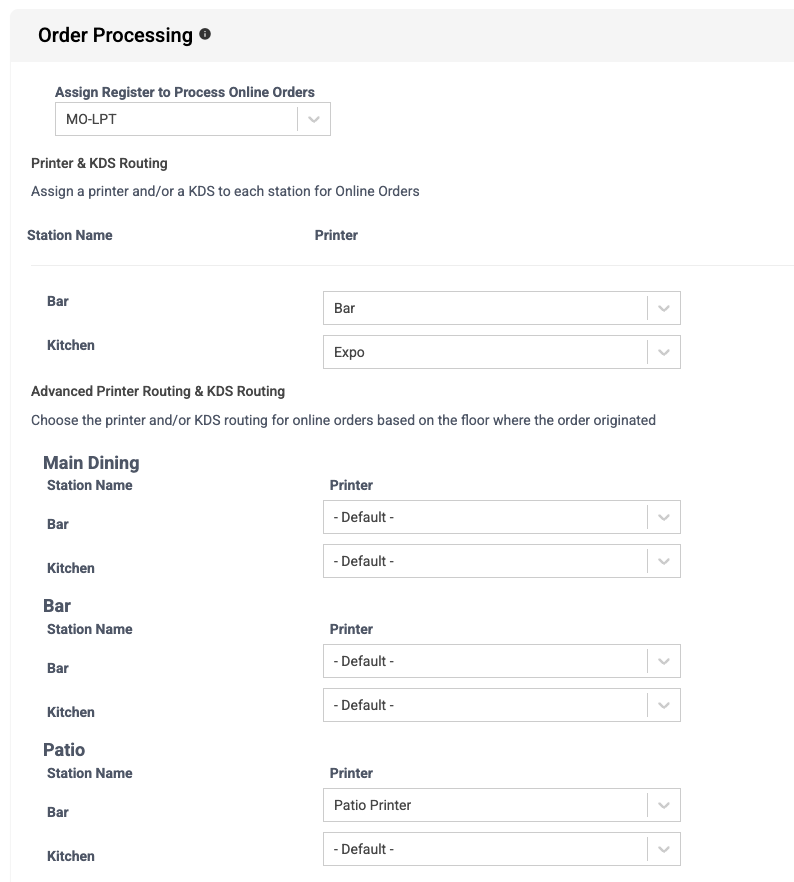
Once a terminal is designated to process orders, an order routing section will appear to assign printers and/or KDS screens to print or display the order.
→ Printer & KDS Routing (Default Settings) apply to all Union Mobile and Online (Etab, DoorDash, GrubHub, Uber Eats) order routing across the venue.
→ Advanced Printer & KDS Routing (Custom Union Mobile Settings) gives you the option to custom route orders depending on which “Floor” a guest is ordering from. Useful example: A guest is scanning a QR code at a table listed on your “Patio” floor, and you would like drink items to print to the Patio Printer instead of the default “Bar” printer.
You can adjust what Tables are on what Floor in the Settings > Venue Layout section.
You can create or adjust Floors in the Settings > Floors section.
NOTE
Items are routed to print by station assignment. For example, a cocktail item can be assigned a bar station, and that station can be routed to print to a designated bar printer/KDS, while a food item can be assigned a kitchen station, and that station can be routed to print to a designated kitchen printer/KDS, all from the same guest order.
You can adjust what stations are assigned to items in the Inventory > Item Management section. Set these up before going live to avoid orders landing at the wrong station (or no station).
5. SETUP GUEST "ORDER READY TO PICK-UP" NOTIFICATIONS
5. SETUP GUEST "ORDER READY TO PICK-UP" NOTIFICATIONS
Here’s how it works and what your staff options are.
How the guest gets notified
When an order is ready for pickup, Union sends the guest an automated text message. There are three ways to trigger this once enabled:
- Manual notify from the POS terminal:
Long-press the tab on the terminal, then select Notify customer. Union will text the guest that their order is ready for pickup. Staff at the pickup window can do this the moment the order is ready. - Manual notify from the KDS terminal:
If your venue uses a Kitchen Display System, a “Notify Customer” button will appear on each KDS screen that staff can select on each order ticket. This can be disabled for KDS terminals that don’t need it visible, like “Fry” or “Grill” stations. In Settings > Hardware Setup > KDS, choose each KDS terminal and deselect the “Notify Customers” toggle. Only disable Notify Customers if another KDS is responsible for notifying customers within KDS Hubs. Notify Customer disabled does not allow for auto notify on a KDS. - Auto Notify by Bump via KDS terminal:
If your venue uses a Kitchen Display System, select “KDS Auto Notify Customer” in the Customer Notification settings. When a staff member bumps a ticket to complete on the KDS, Union automatically sends the text to the guest without requiring an additional button press.
Set up default pickup location messages
You can create separate default pickup locations for Call-In Phone/Third-Party Orders and Union Mobile Orders. For example, if a guest calls in to place a pickup order, you may want them to pick it up at the host stand, but if a guest is at a table or in a standing area, you may want them to pick it up at the bar.
To configure this, navigate to:
Settings > Notification center > Customer Notifications
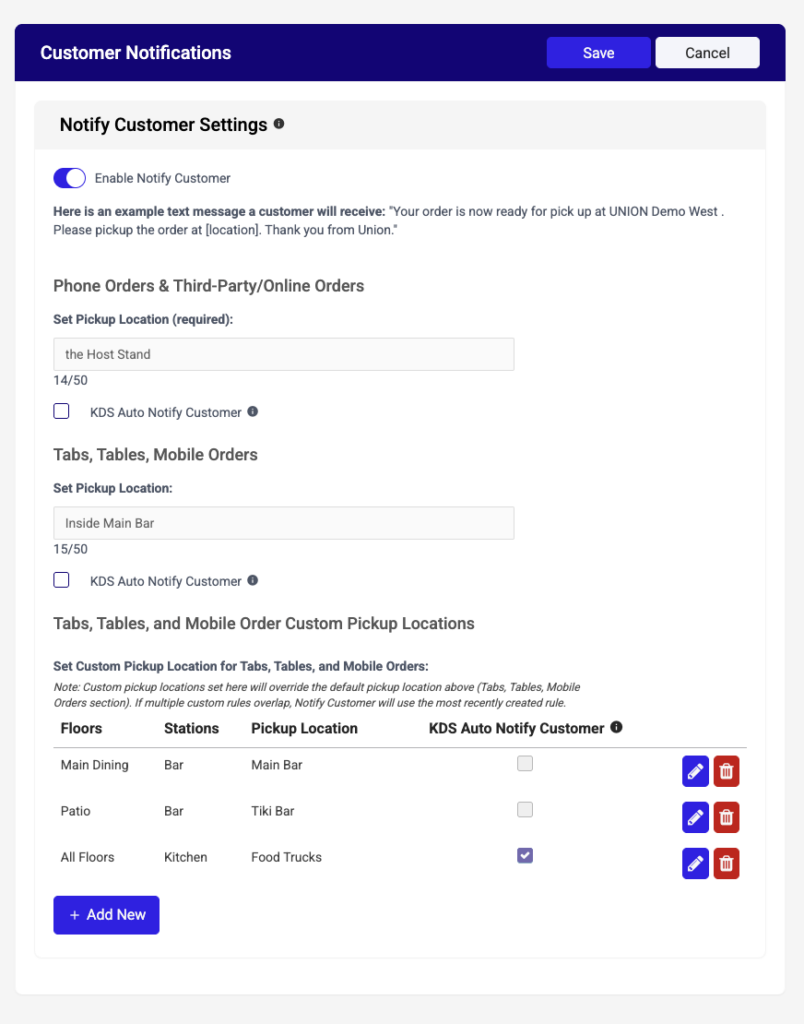
PRO TIP
At the bottom of this section, you can also set custom pickup locations by Floor and by item Station, so guests are notified where to pick up their specific items depending on where they ordered from, if applicable.
For example, items with a Bar station assigned and ordered from a Main Dining floor, can receive a message to pick up their items at the Main Bar, but items with a Bar station assigned and ordered from a Patio floor, can receive a message to pick up their items at the Patio Bar. If there isn’t a custom option created, the system will use the default settings in the top sections.
Does staff need to mark the order as “picked up”?
There is no required “picked up” confirmation step. Once the guest has been notified and collects their order, the tab remains open on the POS until it is closed out, either by the guest closing it on their phone or by staff closing the check for them on the POS terminal. This keeps the workflow simple for your team at the pickup station: their only job is to prepare the order and hit Notify Customer (or let auto-bump do it via KDS).
Any checks left open at the end of the business day can always be closed out using the Closed Walked checks function.
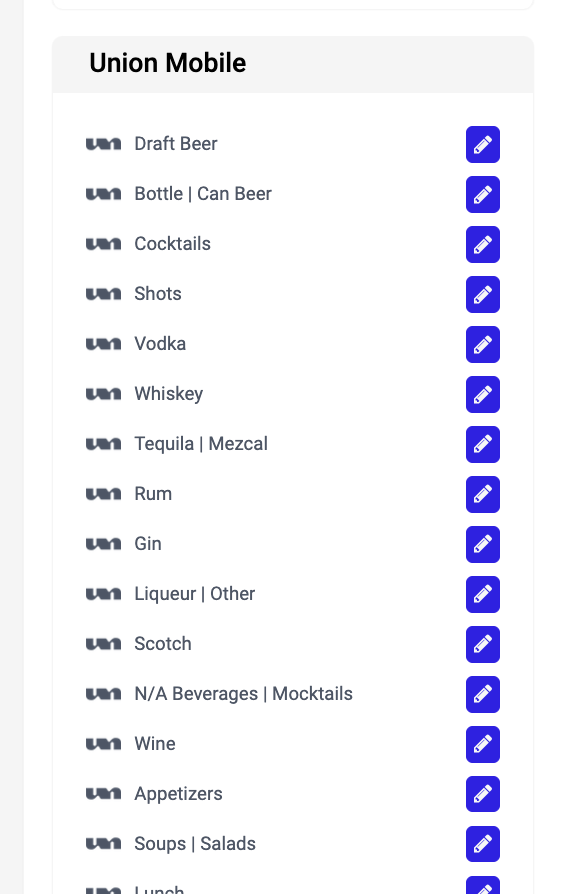
6. CREATE OR CUSTOMIZE YOUR UNION MOBILE MENU SCREENS
Your Union Mobile menu screens are separate from your POS menu screens, which means you can tailor them specifically for the guest ordering experience, including what items appear, in what order, and when.
To add, remove, or rearrange sections:
Inventory > Menu setup > Menu screens > Union Mobile
Select + Add New > Union Mobile at the top right to create a new Union Mobile menu screen.
Simply drag & drop the menu screens to rearrange their order.
PRO TIP
If you have a menu screen in another section and you want to copy it to the Union Mobile section or replace an existing Union Mobile menu screen without having to recreate, navigate to the menu screen you want to duplicate, select the edit pencil, and then select “Duplicate Menu Screen” at the top.
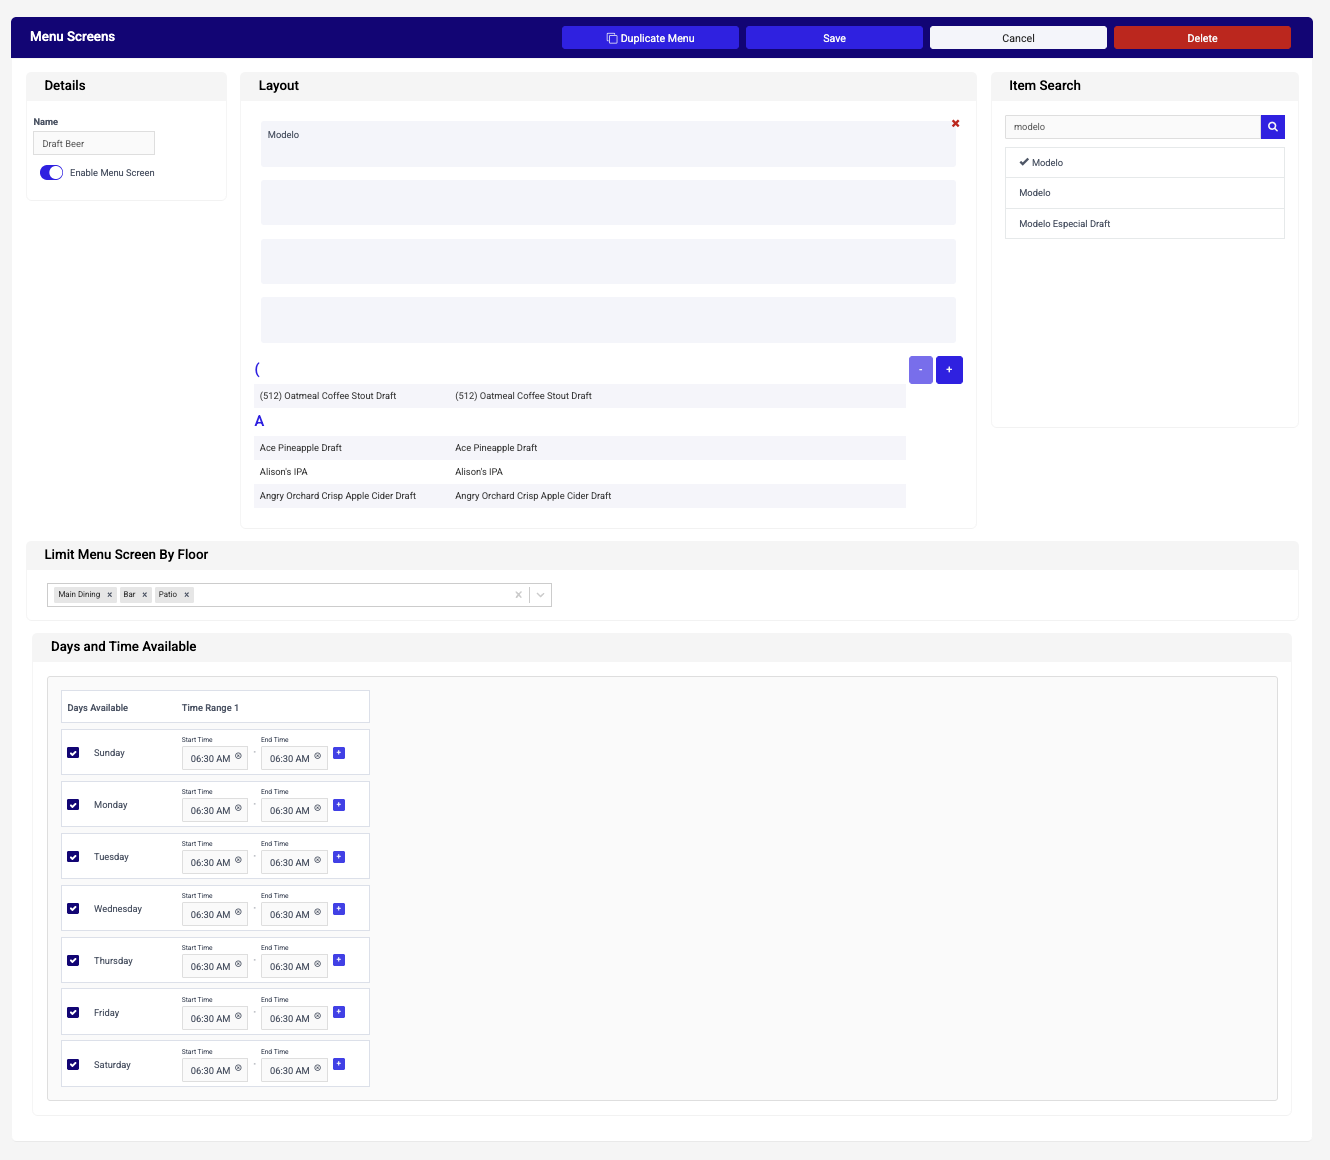
- Quick enable/disable option: Turn menu sections on or off quickly with one toggle.
- Organize item display order: Items will display alphabetically, but you can choose a custom order in the top section by dragging an item in a specific order at the top.
- Time-based scheduling: Set what time a menu screen turns on or off depending on the day of the week. Useful for happy hour menus, late-night items, or a morning coffee menu.
- Limit Menu Screen By Floor: Restrict certain menu screens to be visible only on certain floors of your venue. For example, show a menu screen on the Main Dining, Bar, and Patio but not on the Cocktail Lounge floor.
Note: If this section is blank, the menu screen will show on all floors.
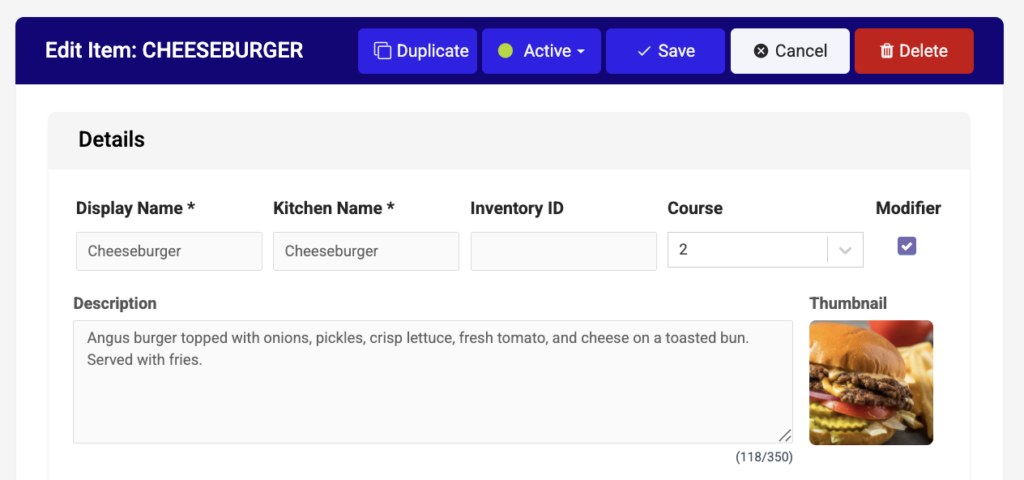
7. EDIT ITEMS FOR BETTER GUEST ORDERING EXPERIENCE
Menus with photos consistently drive higher average check sizes: guests are more likely to order (and upsell themselves on) items they can see.
To update photos or descriptions for any item:
Inventory > Item management
Select the item and upload a photo or update the description.
PRO TIP
When adding new beverage brand items, select the option in the Display Name drop-down; Union will automatically pull in the item photo and description. Choosing the drop-down option also pre-maps the item for quicker featuring if and when it is in the Union Brand Network.
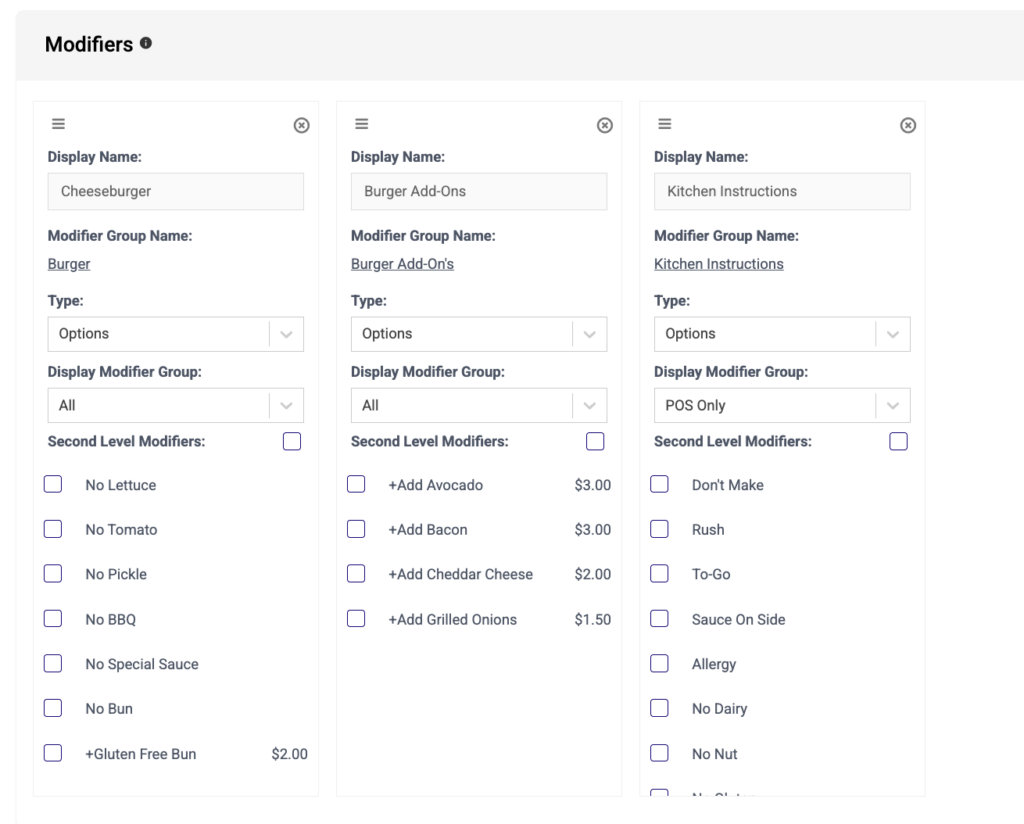
Different Modifier Group options for Mobile/Online vs. POS:
You can configure modifier groups that only appear on the POS terminal view or Union Mobile app, which is helpful for displaying internal staff modifier options only to staff on the POS or limiting complex customizations during high-volume periods.
All = All views can see this modifier groups
POS Only = POS terminals can only see this modifier group
Online Only = Union Mobile and Third-Party Services can only see this modifier group
Hidden = Used to save modifier groups on an item to be accessed at a later time, like big events.
8. CLAIMING + MANAGING MOBILE TABS
All mobile checks appear on the terminal under the All Checks view, and listed under the employee Unclaimed. Staff can claim any of these by long-pressing the tab and selecting Claim. If a staff member is assigned to a table, all checks at that table will automatically be claimed by that employee.
Orders print with the guest name, table number, and server name if one is assigned, or as “Unclaimed” if not.
END OF DAY NOTE
If you choose to keep orders under the Unclaimed employee, you’ll need to run the checkout for Unclaimed before running your end-of-day report. This way all tips and sales are included on the current End of Day report.
Staff tools on every mobile tab
→ Add items, void items, transfer items to another tab, apply discounts or adjustments, apply another form of payment, and close it; all using the same POS flow as a standard check.
→ View the guest’s customer profile: average spend, visit history, last visit date, and most ordered items, and any saved staff notes. Use this to personalize their experience.
→ For walk-outs: Using the Close Walked Checks option, select all open checks and close them with a single button, automatically applying your preset gratuity.
9. UNION OFFERS WITH BRAND NETWORK FEATURES
Any guest who uses Union Mobile can access Union features within the Brand Network: These features may be recommendations or offers paid for by Union directly to the guest’s tab.
→ To map a cocktail to a featured brand, include the brand name in the item’s title and/or description.
Check the Featured Brands landing page in your onboarding portal to see active programs, upcoming launches, and expiring offers. Bookmark it, it’s the fastest way to stay current without waiting for email announcements.
PRO TIP
When adding new beverage brand items, select the option in the Display Name drop-down; Union will automatically pull in the item photo and description. Choosing the drop-down option also pre-maps the item for quicker featuring if and when it is in the Union Brand Network.